10,643 metres is the average total distance central midfielders covered in a 4-3-3 in one tracking study of professional players, and it reframes the 4 3 3 vs 4 4 2 argument as a question about people rather than shapes (Coventry University's 11 v 11 position and formation research). A formation on a whiteboard costs nothing. The running it demands comes out of somebody's legs.
Most formation debates begin with pictures. Three midfielders against two banks of four, wingers against wide midfielders, one centre-forward against a pair. Pictures are the easy part, and they're usually where the comparison stops.
The harder questions are about workload and phases. Which players absorb the extra running, what shape the team holds once the first press is broken, and what the side gives up in order to get the thing it wants. Those questions decide whether a formation survives ninety minutes.
Table of Contents
4-3-3 and 4-4-2 Side by Side
4-3-3 and 4-4-2 at a glance
Feature | 4-3-3 | 4-4-2 |
|---|---|---|
Outfield line-up | Three central midfielders and three forwards | Two central midfielders, two wide midfielders and two strikers |
Width source | Wingers or wide forwards on the touchlines | Wide midfielders, with width often shared by full-backs |
Central midfield numbers | Three players | Two central players, plus two wide players who can tuck in |
Typical front pair | One centre-forward and two wide forwards | Two strikers working as a pair |
Common press shape | Front three step onto centre-backs and full-backs | Two forwards screen the central pass while the midfield four shifts across |
Central overload potential | Three versus two in midfield when the shape is set | Two versus two unless a wide midfielder tucks in |
Main trade-off | Heavier running load for the midfield three | Compact two banks, but can be outnumbered centrally |
Those rows describe default shapes rather than fixed player locations, so the same formation can behave very differently in and out of possession.
What each row is really saying
The outfield line-up row is the one coaches quote and the one that misleads most. A 4-3-3 holds a three-against-two in the middle only while the three stay connected. Once the two advanced midfielders push level with the centre-forward, the structure is closer to 4-1-4-1 and the central edge disappears.
Width separates the shapes most clearly in training. A 4-3-3 can hold the touchline with a winger and let the full-back choose when to overlap. A 4-4-2 usually asks the wide midfielder and the full-back to share the flank, which makes width a two-player job rather than an isolation.
The trade-off row is the honest one. The 4-3-3 buys central numbers and instant width with midfield running. The 4-4-2 buys two compact banks and a front two that can occupy both centre-backs, and it pays for that whenever opponents find the spare midfielder. Reading how a coach reshapes those rows is easier with a full 11 v 11 formations guide open beside the match.
Three checks before any theory
Count the central midfielders. Not the names listed there, but the bodies in the middle when the team has the ball.
Find who holds width in each phase. A winger on the touchline and a winger who has stepped inside are different formations in the same match.
Watch how the forwards press. Pairs press as a unit; a front three can press across a back line but leaves the midfield three covering wide space alone.
Keep this table in view, because every argument about these two shapes comes back to one of its seven rows.
Where Both Shapes Come From and How Usage Has Shifted
UEFA's technical reporting caught the swing inside a single season, and the numbers are worth seeing before the reasons behind them.
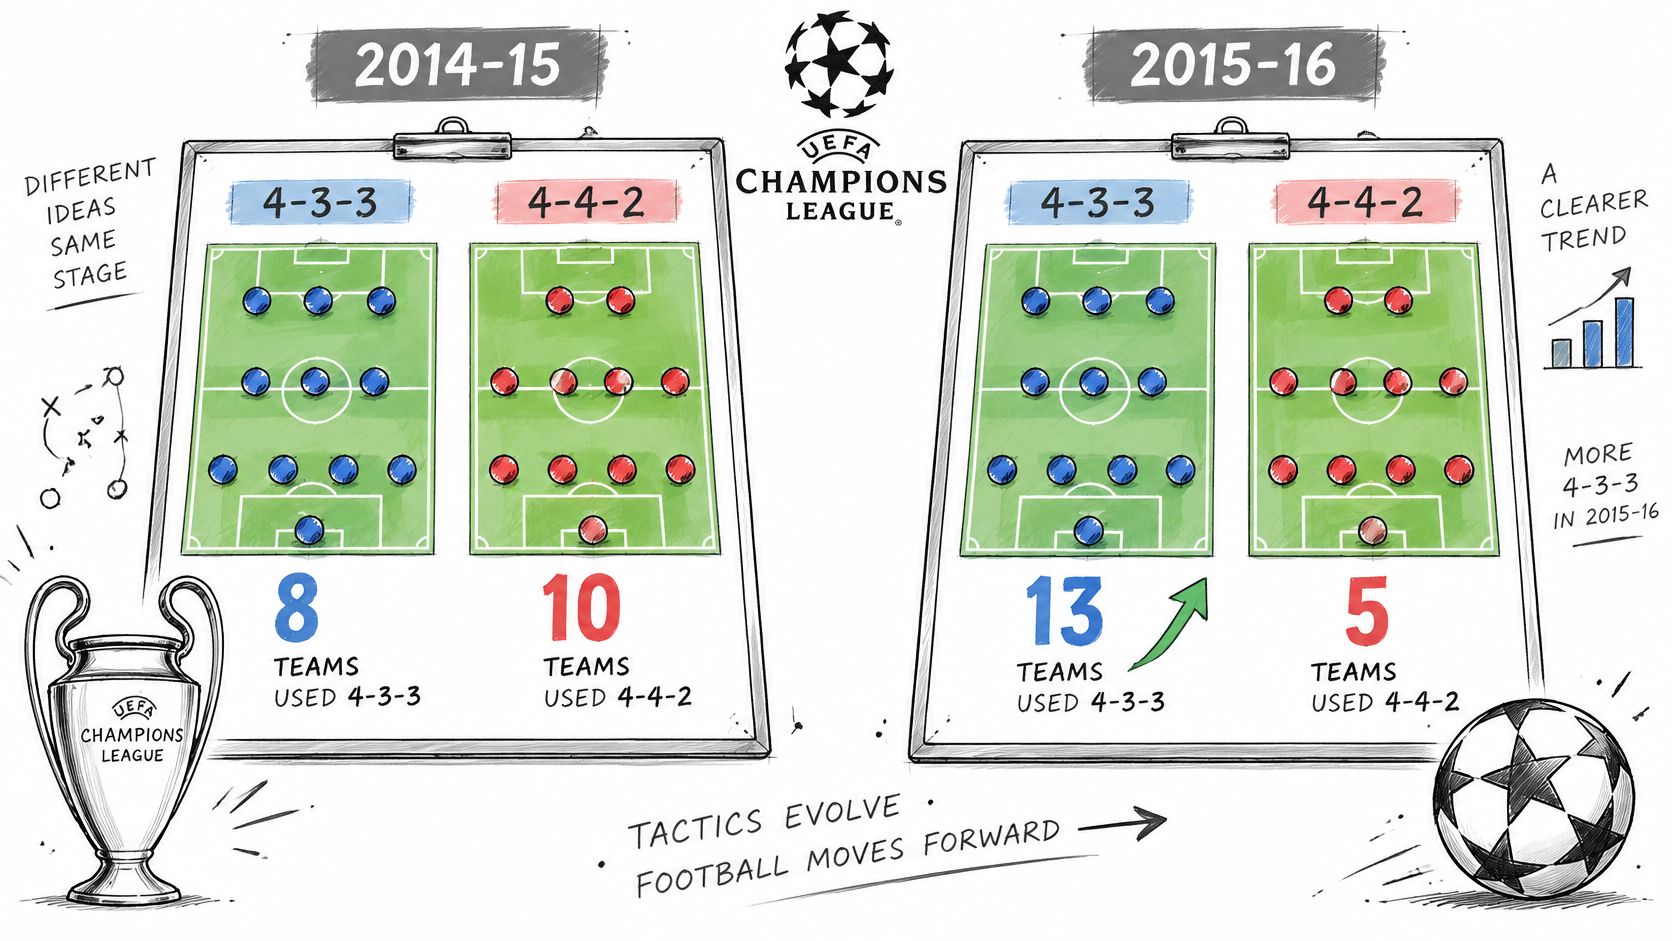
UEFA's technical report on how 4-3-3 overtook 4-4-2 counted 8 teams primarily using 4-3-3 and 10 using 4-4-2 in the 2014-15 Champions League, then 13 and 6 a season later, a 62.5% increase against a 40% reduction, with 4-2-3-1 on 10 teams in 2015-16. Read as workloads, the move put more coverage into midfield threes and front threes while 4-4-2 kept a live compact-bank model.
The value of that count is directional evidence from one competition. The swing was five teams toward 4-3-3 and four away from 4-4-2 between those counts, and the 10-team 4-2-3-1 bloc shows the three-man midfield idea changed address rather than disappearing.
One line of history for each shape
The modern 4-4-2 is commonly traced to Viktor Maslov, who adapted Brazil's 4-2-4 after the 1958 World Cup and used two compact banks of four at Torpedo Moscow, winning the Soviet league title in 1960 before the structure supported Dynamo Kyiv's success later that decade (a review of World Cup formations). The 4-3-3 became internationally associated with the Netherlands' 1970s Total Football and later with possession-heavy Barcelona under Pep Guardiola.
History explains identity, not superiority. A shape that won a league in 1960 and a shape that won European Cups in the 2000s both answered the questions their era asked.
A formation is a set of jobs; the positions are only where those jobs begin.
The useful question is which problem each shape is built to solve, and what running bill it hands the squad.
Roles Each Position Carries in Both Shapes
Positional roles in 4-3-3 and 4-4-2
Position | Role in 4-3-3 | Role in 4-4-2 |
|---|---|---|
Full-backs | Overlap for width when the winger draws pressure | Hold the touchline and support the wide midfielder |
Central midfielders | Holding player plus two advancing midfielders | Two box-to-box players, one anchoring and one arriving late |
Wide players | Wingers stretch the defence and cut inside | Wide midfielders recover runs and deliver crosses |
Forwards | Centre-forward attacks space, wide forwards press high | Two strikers coordinate pressing angles and combine |
Where each line's job diverges
The full-back is the clearest tell. In a 4-3-3 he is a width option, not the width itself, so the overlap comes only when the winger has drawn pressure and the flank will not be doubled. In a 4-4-2 the full-back is often the second man on the ball, supporting the wide midfielder rather than running beyond him.
Central midfield splits along a similar line. A 4-3-3 usually carries a holding player who screens and covers full-back advances, plus two who arrive in the box and cover the wide spaces either side of him. A 4-4-2 tends to use two box-to-box players who swap who anchors and who arrives late, which makes communication matter more than job titles.
The defensive cost sits with the wide players. Wingers stretch a defence and cut inside to shoot. Wide midfielders recover runs and deliver crosses, and the difference shows in the last twenty minutes when one of them is also a defender.
The two shapes also produce different attacking pictures. UEFA technical-report material links 4-3-3, or 4-2-3-1, with wide players and a high-tempo passing game from the middle to the front, while descriptions of 4-4-2 include a midfield diamond, combinations and through-passes, flank use and a significant threat from crosses, as set out in UEFA's technical report library. Which of those pictures a coach chooses is a question of matchups and personnel, not of the diagram itself.
Write the job before the label
Each role in the table is a workload first and a position second. A fuller breakdown of what each shirt is responsible for sits in a guide to 11-on-11 positions, and mapping those responsibilities against the runners a squad has is what turns a diagram into a plan.
Coach the transitions rather than the starting grid. After losing the ball, the nearest forward presses, the second forward screens the central pass and the midfield line narrows. After regaining it, the first pass should identify whether the wide player, the overlapping full-back or the second striker is the best outlet.
Those moments are worth drawing on their own. A free TFA Tactics Board covers what this work needs: ball, pass and run arrows, labels, player numbers, team colours, coaching notes and PNG export.
Name the responsibility of every position before naming the shape. Players learn a job faster than they learn a formation label, and the label is the last thing that should change.
The Midfield Workload Each Shape Demands
The physical bill for a shape shows up in tracking data, and the midfield is where it lands hardest.
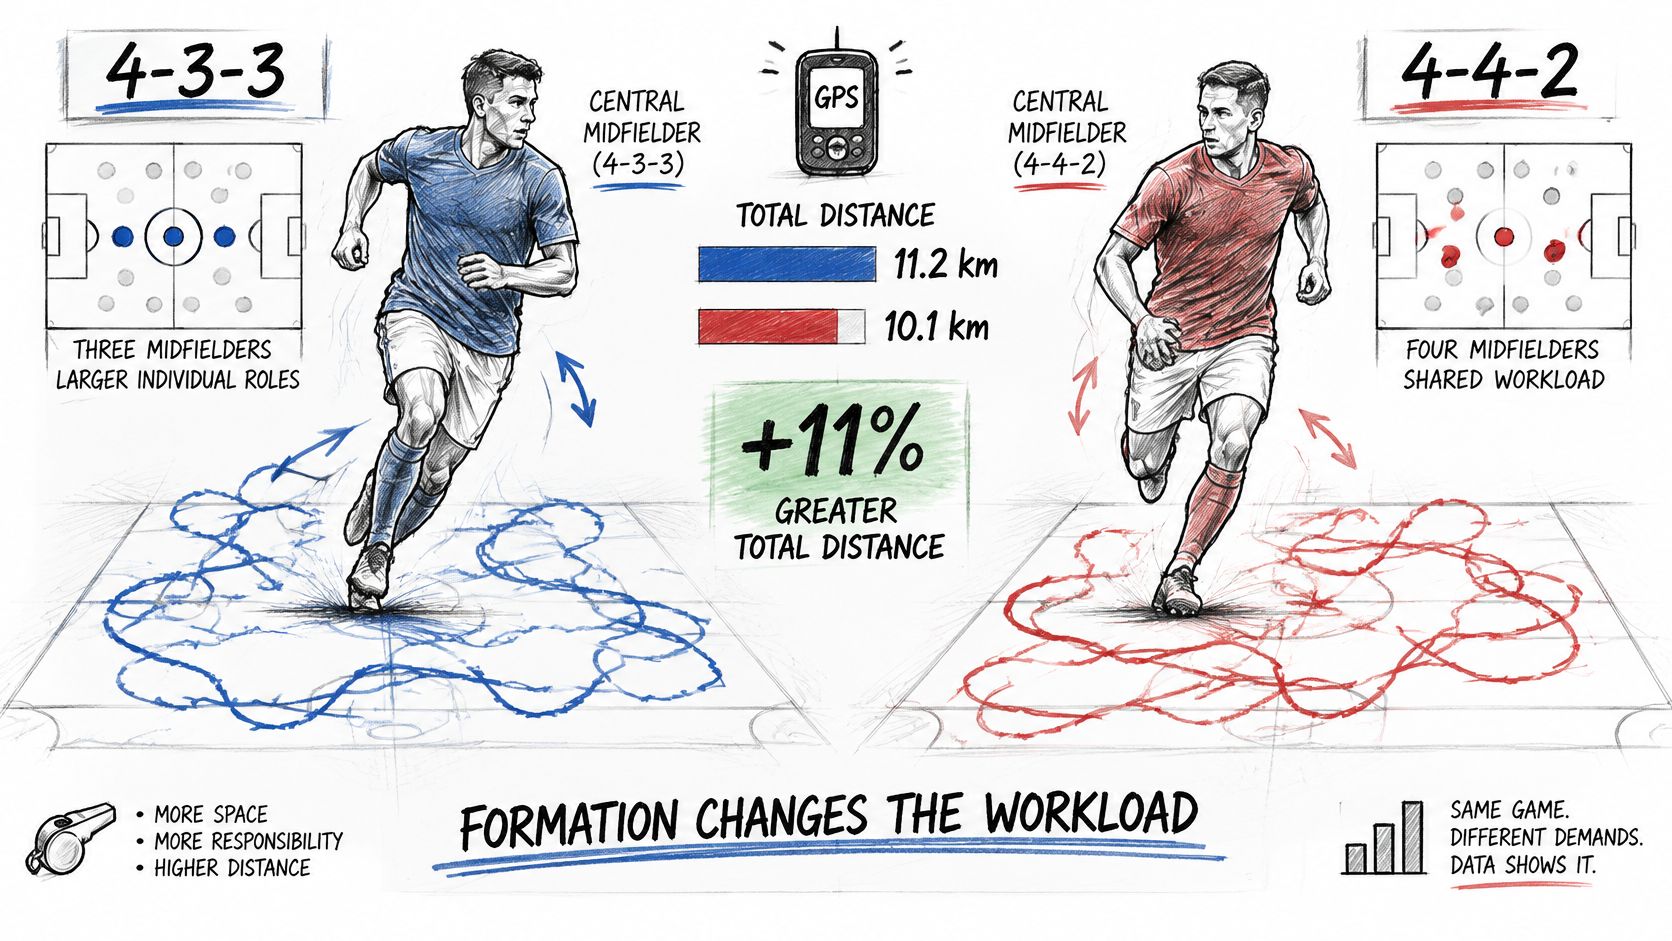
A GPS study of professional players found central midfielders in a 4-3-3 covered more than 11% greater total distance than central midfielders in a 4-4-2, a difference reported as statistically significant at p=0.012 (the published study in PubMed Central). The same study recorded high-metabolic-load distance over 14% higher in the 4-3-3, a result that did not reach statistical significance (p=0.367).
The two numbers carry different weight. The total-distance gap is the finding the data supports firmly, and it points at running capacity rather than sprint quality: the midfield three covers more ground across a match. The high-metabolic-load figure is directionally interesting and statistically uncertain, so treat it as a hint about intensity rather than a number to quote at a squad.
What the gap does justify is a planning conclusion. A 4-3-3 pushes a larger share of the physical burden onto its midfield three, which means recovery coverage, rotation and substitution planning belong in the game model. The key question is whether the squad can sustain the shape every week, and sustaining it is a staffing decision.
Where the compensating movements go
Diagram the cover, not just the shape. In a 4-3-3, show the holding midfielder shifting across to cover a full-back's advance, and show which of the two advanced midfielders holds the central lane while that happens. In a 4-4-2, show a winger or a striker dropping to prevent the three-versus-two overload before it forms.
Separate the phases, because the workload changes with them. Out of possession, a 4-3-3's wide forwards can press high while the midfield three covers large lateral spaces behind them. In a 4-4-2, the wide midfielders make repeated recovery runs, and the two strikers set the pressing angle that starts everything. Drawing each moment on its own keeps the compensating run visible instead of implied.
Three questions for the squad
Who has the profile to absorb the extra running? Name the two midfielders who will cover the ground in a 4-3-3, because the load rarely splits evenly across the three starters.
How do substitutions change the load? A like-for-like change keeps the structure; a change of type shifts which lane gets covered and who covers it.
Can the shape be sustained for ninety minutes? A midfield three that runs itself empty by the hour mark becomes a second-half problem, whatever the first half produced.
The cost difference sits in the midfield either way. The 4-3-3 concentrates distance in three central players, while the 4-4-2 spreads its share across wide recovery runs and the strikers' pressing work. Choosing between them is choosing where the running gets done.
Practising Both Shapes and Switching Between Them
Both practices below are examples rather than prescriptions, and both use 10v10 plus goalkeepers because each full shape fields ten outfield players.
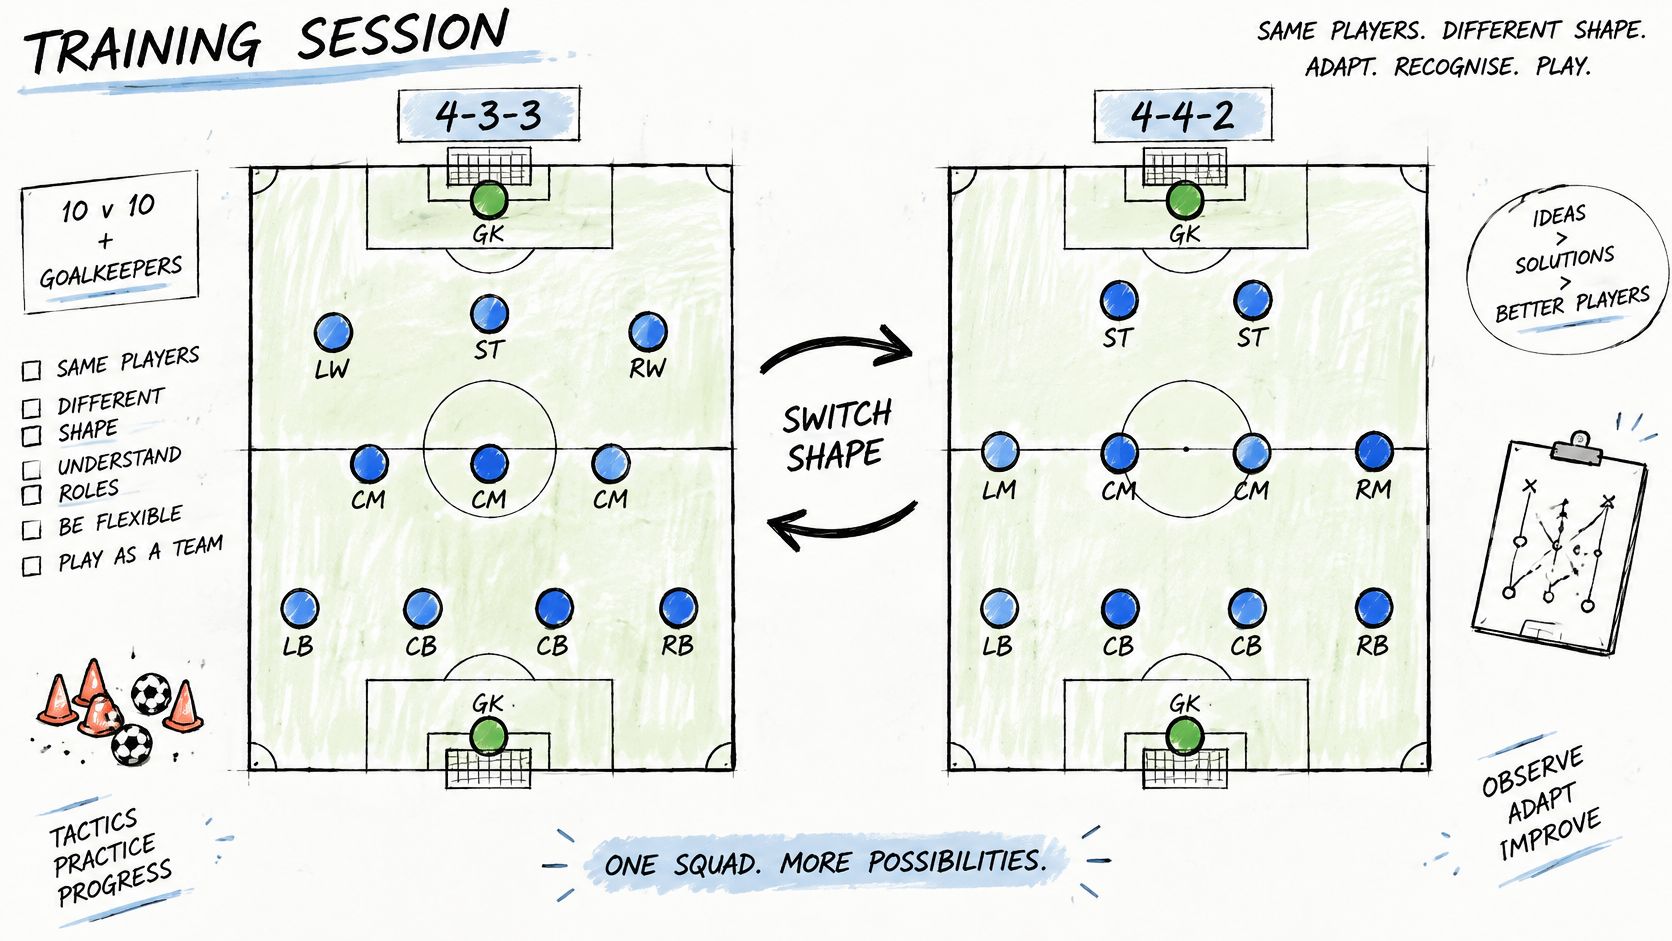
Example one, attacking with a 4-3-3
Objective. Score after a wide player receives outside the opponent's narrow block and the team enters the box.
Player numbers. Ten outfield players plus goalkeepers, 10v10.
Setup. A back four, three midfielders and three forwards attack the same 4-3-3.
Coaching cues. The winger receives outside the block, the nearest midfielder offers the inside option, and the full-back overlaps only when the winger draws pressure.
Progression. Allow the defending full-back to press earlier, which forces the winger to decide faster.
Adaptations. For developing players, widen the wide channel or permit an extra touch.
Example two, attacking with a 4-4-2
Objective. Score from a forward combination, a third-player run or a cross following a wide attack.
Player numbers. Ten outfield players plus goalkeepers, 10v10.
Setup. A back four, four midfielders and two forwards against the same 4-4-2.
Coaching cues. The first striker threatens behind, the second connects underneath, and the midfield line arrives in the box rather than staying flat.
Progression. Limit touches in the central area so combinations have to be quick.
Adaptations. For advanced players, add a transition timer that starts after every regain.
Switching between them mid-game
The same ten players can rehearse the switch inside one session, because moving from a 4-3-3 to a 4-4-2 takes repositioning rather than substitutions. One wide forward drops to the midfield line while the other stays high beside the centre forward. That single movement converts the shape.
The workload moves with it. The player who drops gives up box arrivals for recovery runs, and the winger who stays high inherits the pressing share of a second striker. Run the two practices back to back on a clear call for the change, so the squad rehearses the movement rather than only the starting shape. Sketch the starting positions and the end positions separately so the before and after are unambiguous.
Building either board follows the same four steps: choose the starting shape, map the football action, add the coaching detail, then export and communicate.
Matchups, Selection and the High Line
The matchup table below treats each shape as a set of workloads rather than a fixed diagram: where the running falls, which spaces need a covering player, and which opponent setups expose the gaps.
Matchups by opponent setup
Opponent setup | Edge for 4-3-3 | Edge for 4-4-2 | Watch for |
|---|---|---|---|
Flat back four in a narrow block | Wingers stretch the defence and isolate full-backs | Two strikers threaten both centre-backs | Wide overloads may be slow without rotation |
Two-man central midfield | Three midfielders win central numbers | Four midfielders and two strikers match the centre | Back-line gaps if full-backs advance |
High press with fast full-backs | Midfield three covers spaces behind wide forwards | Compact banks are hard to pass through | Wide midfielders can be left isolated |
Team with strong wide outlets | Full-back and winger can double up on the flank | Wide midfielders must recover quickly | Counterattacks against a stretched defence |
Those rows are tendencies, not fixtures. Opponent formation, the profiles of individual players, home advantage and the difference between in-possession and out-of-possession behaviour all move the result, which is why a shape that looks dominant in one fixture can look exposed in the next.
The high line and Law 11
Under Law 11, a player is in an offside position only when part of the head, body or feet is in the opponents' half, nearer the goal line than both the ball and the second-last opponent (IFAB's Laws of the Game, Law 11). Standing beyond the defensive line is not an offence. The offence is becoming actively involved in play, by playing a team-mate's pass, challenging an opponent or clearly obstructing an opponent's ability to play the ball.
That distinction changes how each shape defends high up the pitch. A 4-3-3 can stretch a back four horizontally with the centre-forward and two wide forwards, pinning the full-backs and making the first forward pass harder to find. Two strikers in a 4-4-2 can time their runs together and attack the space behind a high line with a partner already close, but the midfield four has to shift as a unit to protect the space between the lines.
The cue that travels across both shapes is to press on the pass and recover on the cue. Defenders step up when pressure stops a clean forward pass and drop when the ball carrier has time to play behind them. When an offside offence is given, the restart is an indirect free-kick from where the offence occurred, including when that location is inside the player's own half.
What the match evidence shows
Formation-level evidence points at a trade-off rather than a superior system. A study using match KPIs reported that 4-4-2 produced the highest pressure-given value, suggesting strong defensive pressure potential, while 4-3-3 negated the greatest number of opponent shots and consistently outperformed other tested compositions across several KPIs, as summarised in the published match analysis. A separate analysis of English Premier League seasons pointed in a similar direction, finding the home 4-3-3 held an edge over 4-4-2 while 4-4-2 was the weakest of the examined systems for away teams.
The split is consistent with what the workloads predict. The 4-3-3 suppresses shots and holds territory through its midfield three; the 4-4-2 applies more direct pressure and commits two forwards against the centre-backs. Both findings sit inside squads and leagues that may not resemble the team being planned for, so they describe tendencies rather than verdicts.
The selection rule
The priorities that decided the role-by-role comparison apply here in the same order: what the match demands first, what the squad can sustain second. The table above only adds the opponent-specific weighting, since a narrow block, a two-man midfield or a high press each pull the same trade-off in a different direction.
The test that settles it: the formation should answer the match problem in front of the team, while the squad profile decides whether that answer can be sustained for ninety minutes.
Both shapes sit in the free formation library alongside 4–2–3–1, 3–2–5, 3–4–3 and 5–4–1, so a matchup can be drawn on the free tactics board with both teams on the same pitch and exported as a PNG before training.
Both shapes in this comparison are in the free formation library at TFA Tactics Board, so a coach or analyst can put a 4-3-3 against a 4-4-2 on the same 11v11 pitch and mark the covering movements, pressing angles and wide outlets that decide the matchup. The board runs in the browser with no download, exports a PNG for the team meeting, and keeps coaching notes attached to the diagram. Set up the two shapes side by side, label who absorbs the running in each, and see which one your squad can sustain.